Installing PHP in Windows with Apache
It
is assumed that you have successfully installed and configured apache
on your windows machine. Please refer to my previous article in case
you need guidelines to install apache.
Now
since Apache is already installed on your windows, you can access
localhost through browser. Now lets start installing PHP.
In order to install PHP you need to get the copy of php from php.net (official website of PHP). Download the copy of the latest version of php from this site. Thread safe version is recommended for installation over apache. You will get zip file when you download php. Simply extract this to any location where you want to keep php (I extracted to d:\php)
In order to install PHP you need to get the copy of php from php.net (official website of PHP). Download the copy of the latest version of php from this site. Thread safe version is recommended for installation over apache. You will get zip file when you download php. Simply extract this to any location where you want to keep php (I extracted to d:\php)
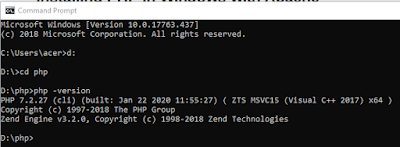
Open
terminal (start>run type cmd to open)
to
to d: drive and change directory to php then issue php – version
command to check if php is running (ref to figure)
If
you can see the php version You now need to configure apache to run
php script.
Prepare php.ini file
Php.inis
important file that is required by apache, to create this file simply
create a copy of php.ini-production and rename it to php.ini. Now
open this file (php.ini) in your favorite text editor. And locate for
extension_dir and assign the location of php extension directory
(d:\php\ext in my case). You may also enable some more extension like
curl, gd2, mysqli etc
configure apache.conf
Configuring
php.ini alone is not enough you need to tell apache how to process
php files. In order to do so open httpd.conf (in conf directory of
you apache folder) in your favorite text editor. And add following
lines to end of this file
LoadModule
php7_module "d:/php/php7apache2_4.dll"
AddType
application/x-httpd-php .php
PHPIniDir
"d:/php/"
Restart apache
Go to start>run and type services.msc to start service management console. Locate apache in the list of services. Select Apache and restart the service. If no error is encountered it means apache is successfully restarted.Testing your first php script
Once again open your favorite text editor and type following codes into it:and save the file as test.php in document root of your webserver. (as I had installed apache on d:\apache24\htdocs)
Now open web browser and type http://localhost/test.php
you should see this output on browser, which means that php is working properly on apache server.
Now keep in mind that you need to save your webpages on htdocs (or any other directory you have configured in httpd.conf) i.e. the document root of your webserver.
Since this series is to install AMP on windows I’ll not discuss installation of MySQL as MySQL is already installed as part of ICT Phase-II content.
Next article I’ll try to follow the process of installing phpmyadmin to manage MySQL.


No comments:
Post a Comment